Enhance your projects with style
From now on we offer spot varnish for refining and we prepared a tutorial to help you create this effect with InDesign.
At print24 spot varnish is handled like a 5th color separation in addition to CMYK. That’s why creating spot varnish is similar to the appliance of spot colors but there’s still a little difference. Keyword: over printing.
Let’s start from the beginning.
Our example is a greeting card with ornaments which should appear as partial varnish.
If you’re creating spot varnish for multiple elements we recommend using a new layer (we call it “spot varnish”) and place all future elements in it.
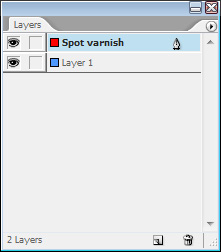
To create varnish choose the symbol left to the „Bin” or click the drop-down menu in the right corner above and choose “New Color Swatch …”
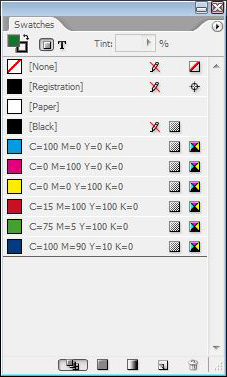
The dialog box allows you to change several settings. Start with changing the name to “spot varnish”, “varnish” or something like that to be able to identify the spot varnish channel later.
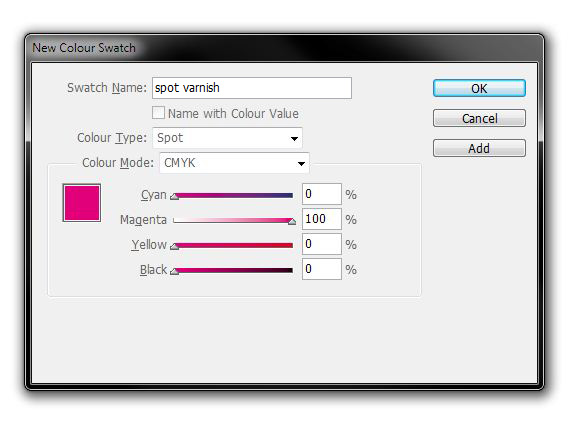
Now change colour type from “Process” to “Spot”. That’s important to create a new color channel .
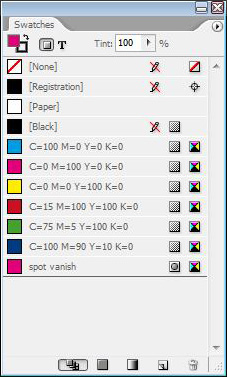
We recommend using a signal color as we did with 100% magenta. The color is not important since varnish is transparent and it is just to remind you which elements get spot varnish in the end.
Now determine this color mode for all elements you want to have varnished and be careful to always apply 100% color.
Next step is really important for production:
Select all varnish elements and open “Attributes” via “Window > Output” menu and set a checkmark at “Overprint Fill”.
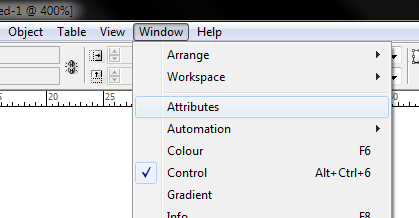

That’s so important because it is a spot color which needs to be printed on a different layer, otherwise the color beneath would be omitted. “Overprint Fill” makes sure that the layout is printed first and the varnish will be added afterwards.
Tip: You can also highlight elements from your layout. Just copy and insert them at the same place of the layout. Change the color mode to spot varnish which you created earlier and it’s done :)
That was quite easy, right? If you have any questions or helpful suggestions don’t hesitate to contact us.


Hi there
Thanks for your useful advice.
If I create a spot varnish layer with overprint as you suggest, but the printer wasts pdf files. how do I supply these? Do the layers somehow stay preserved in PDF? do I make a duplicate file?
Thanks!
WB
Hello!
Yes, if you create a 5th color channel and then export it, it can all be seen in the pdf file.
Hope this helped!
Kind regards,
Very useful.
Thanks a lot for this.
Hello David,
You’re very welcome! Glad you like our little printing hints ;)
Useful if you know where this information is. Maybe put a link to this page on the pages where you’d need it (e.g. – NCR pads numbering section of the fact sheet), or in the email regarding incorrect artwork.
Also, in the latest version of InDesign CC, you have to go to Window > Output > Attributes.
Hello Hayley and thank you for your comment. They are always very valuable to us as they help improve our work and therefore make it easier for our customers.
Wishing you a very good day!
Kind regards,
The print24 team
I actioned the UV Varnish advice above to perfection and sent through PDF but Print24 advised that 5th Colour was missing even though I actioned a separate Layer for Spot UV and used Magenta 100% as a 5th Colour and yes I went in and ticked Overprint Fill (Hayley is right on the latest version Window>Output>Attributes). I exported as PDF but Print24 advise Clear Varnish Channel required. They also advised as this was a combined delivery there would be a further separate carriage charge but when I went back in to their Product Page and entered same data as if I was ordering the same UV Business Cards again – it still said the same delivery date as my original order. Have used Print 24 for many years but I don’t believe they are as friendly as other Print Companies for special print treatments so will be moving business for special items. For £20 extra per 1000 Business Cards I could have had done local but as I say had no trouble previously. Thanks Chris.
Hi,
This is brilliant. Quick question, do i have to copy all the elements with varnish and make a second copy i place in the Spot Varnish layer?
Just so I am making myself clear. Do all the elements that will have a varnish applied have a second copy element with one being in the normal layer and the other placed in the spot varnish layer?
Thanks…sorry if this is a dumb question.
Hello Christopher,
We are really sorry to read you have not been satisfied with your order and our services. We came back to our support service and an agent will be calling you as soon as possible to provide help.
Should you have any other question, please feel free to ask. We’re always happy to give a hand!
Kind regards,
The print24 team
Hello Max and thank you for your message!
You will have to have minimum one copy of every shape that will receive the varnish. However, it is important that you follow the procedure described in our blog article by adding the spot colour and also ticking the Overprint Fill. So basically, all the elements that will receive varnish will have to have a spot colour set up and you need to make sure that, for all of them, the Overprint Fill is activated.
We hope this helps! Please feel free to come back to us should you have any question!
Kind regards,
The print24 team